
Master the swing of a professional golfer
RSG Pro introduces an advanced level swing that analyzes the characteristics of professional golfers’ swings.
The Magical Pivot Point (MPP) Allows for a high-speed swing with the ideal hip rotation motion for professional golfers. –Read Now
The Darts Shot It allows the golfer to achieve a well-timed downward swing with stability and range, similar to a professional golfer’s swing. –Read Now
Professional Approach Shots You will be able to hit short game shots well, even any kind of a lie. –Read Now
The stinger chip shot You will be able to get the ball closer to the hole where the grass around the green is thin. –Read Now
Learn the club’s features and overcome bunkers Explanation is provided on the sand wedge bounce for golfers who are struggling with bunkers. –Read Now
PUTTMAN For golfers who three-putt a lot or who are not good at putting on inclines, we recommend a putting method that controls the ball speed. Learn how to use the putting app PUTTMAN to hit the ball speed. –Website PUTTMAN
Robot Swing Golf V1 Basics We recommend the subscription to those who are aiming for an efficient swing. Although this book is written for beginners and intermediates, it is full of content that advanced golfers should know (the laws of flight of the ball, the flying wedge, the bow wrist, etc.). Since the model swing used as an example is that of Tiger Woods, it should be a helpful reference. –Read book
Goodbye Yips Forever! This is a book that we recommend for golfers who consider themselves mentally weak or are struggling with yips. –Read book
For an explanatory video, please click the YouTube logo.
About RSG Pro
The Magical Pivot Point (MPP)
The Darts Shot
Professional Approach Shots
The Stinger Chip Shot
Learn the club’s features and overcome bunkers
RSG Pro YouTube Playlists
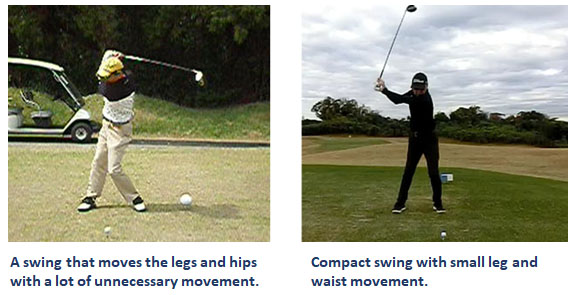
The Robot Swing Laboratory is researching ways to improve one’s golf in a short period of time. While it may feel good to move one’s body freely while learning golf, it can take an incredibly long time to see improvement. An ideal golf swing involves small movements that can be replicated easily.
You don’t need to make big, dynamic movements. However, when you’re new to golf, it’s natural to use your body a lot to hit the ball. This can lead to unnecessary movements.
While hitting numerous golf balls can be fun and lead to improvement, have you considered learning a different movement by understanding the ideal “form?” It’s definitely possible to improve your golf game in a short period of time.

Director
Masayuki Yanagibashi
USGTF Teaching Pro
The Magical Pivot Point (MPP)
Video
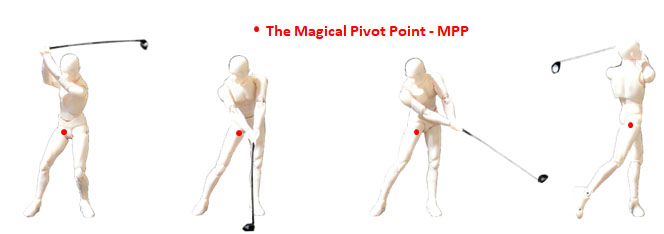
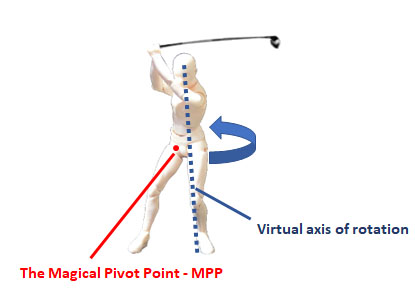
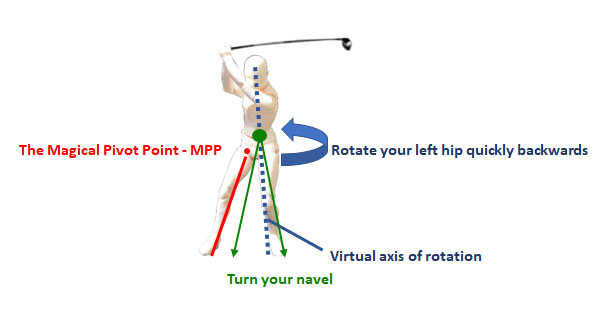
The MPP is the optimal right hip joint position at the start of the downswing (for right-handed golfers), which rotates the hips at high speed and maximizes the speed of the clubhead. Master the MPP in any swing to create the ideal clubhead trajectory.
To optimize the functionality of the MPP , it is ideal to rotate the “navel” 120~160 degrees towards the left toe at high speed at the start of the downswing. This allows the left hip to quickly rotate backwards to the left rear, and the upper body to change direction from right to left at once.
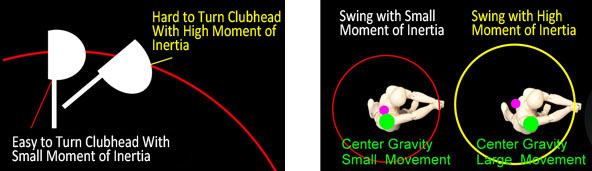
The rotation of the central part of the body moves a short distance in a short amount of time with little force required because the moment of inertia is small . In other words, it can rotate at high speeds.
At this time, if there is extra force in both arms, especially both hands, a large moment of inertia with a large turning radius will occur, which will slow down the speed of the clubhead.
It is crucial to concentrate the power of the entire body on the center of the body.
The Robot Swing Laboratory has named this position of the right hip joint, the Magical Pivot Point – MPP.
If the MPP is in the appropriate position, the swing will be stable
The golf swing is constantly evolving. Since the beginning of golf, swing techniques have changed alongside advancements in gear. In recent years, Tiger Woods’ swing has been regarded as the ideal, and even robot swing models have been modeled after his swing in golf.
However, it seems that there have been significant changes in golf swings since 2020. Previously, large swings characterized by weight shifts and sliding of the hips were common. However, the recent trend in golf swings seems to be towards a more compact swing that revolves around the center of the body, without much movement of the hips.
This is particularly noticeable in the swings of female professional golfers. Despite being less powerful than male professional golfers, female golfers generally hit longer drives than the average amateur golfer, due to their ability to rotate their bodies at high speeds.
The distinctive feature of their swing is the momentary rotation of the body from the downswing to the finish. They are hitting stable, long driver shots with a compact swing that requires less force.
This type of swing is made possible by the MPP. By mastering the MPP, anyone can make steady shots regardless of their swing style.
The moment of inertia of a golf swing
The moment of inertia is often discussed in relation to the golf club. The club heads with a large moment of inertia are less likely to have their clubface angle affected by mishits, resulting in better shot accuracy. However, at the same time, manipulating the clubhead can be more challenging with these clubs, especially when trying to square the clubface to the ball just before impact. This requires precise timing, making it difficult for golfers who prefer to actively turn the clubface during their swing.
Thus, the magnitude of the moment of inertia affects the rotation speed of the object. A larger inertia moment makes it difficult for an object to rotate, while a smaller moment of inertia makes it easier to rotate.
In golf swings, a smaller inertia moment allows for faster rotation. While athletes can improve their swing speed by strengthening their core and arms, it can be challenging for amateur or female golfers in general.
Instead, they should focus on achieving a swing with a lower moment of inertia to enhance shot stability and increase driver distance.
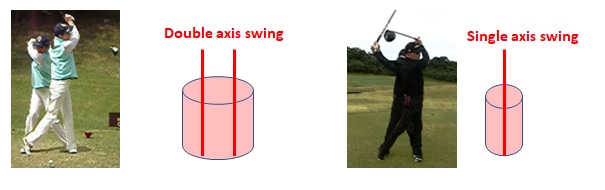
In the past, the “double axis swing” was the mainstream, where golf clubs had a small moment of inertia that allowed the body to rotate easily.
This technique involved shifting weight to the right foot during the backswing and then transferring it to the left foot from the downswing to the finish. The upper body and head rotate together, creating a swing inside a large cylinder. The turning radius of the swing is large, and the method involves actively rotating the arms and hands to control the ball, rather than relying on high-speed body rotation.
In recent years, there have been more clubs with large moments of inertia, so “double axis swing” is no longer common. Now, the “single axis swing” with less weight transfer has become the mainstream golf swing. Certainly, it seems that the moment of inertia of the swing is smaller in the “single axis swing” than in the “double axis swing.”
However, if force is applied to the arms and hands, which are far from the center of the body, the moment of inertia of the swing will increase. In other words, it will deviate from a high-speed spinning swing.
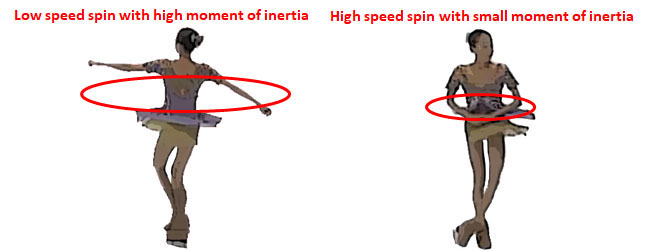
It will be easy to understand if you imagine the spin of a figure skater. At the beginning of the spin, both arms are extended straight out horizontally. The rotation speed of the spin is not fast and is similar to a double axis swing or a swing that requires arm strength. It’s because there is mass outside of the turning radius.
A little after starting the spin, the arms are brought into close contact with the body. This will increase the rotation speed of the spin and make it spin faster. This is because the mass is concentrated in the center of the body, reducing the moment of inertia. This movement is similar to a swing that focuses on the rotation of the waist and upper body in a single-axis swing.
An ideal swing with a small moment of inertia is one where the force is concentrated in the center of the body and there is no force in the parts of the body that are far away from it.
To achieve a fast swing, you need to pivot your hips quickly at the MPP, which is determined by the sensation of the arms and hands lifting the clubhead. You should then rotate your upper body to complete the high-speed swing.
There is no actual axis of rotation in a golf swing
A golf swing involves standing on both feet and swinging the club. As the body rotates, both arms move from the back to the front, and so does the clubhead. Overall, the clubhead is in a rotational motion. Since it is a rotational motion, there will be a rotation axis, but the actual rotation axis is complicated.
For example, if you swing the club with only your left foot, your left foot will become the axis of rotation. Since the entire body is rotating, the axis swings and becomes unstable. If you do the same thing with only your right foot, then your right foot becomes the axis of rotation.
So, where is the axis of rotation when standing on both legs?
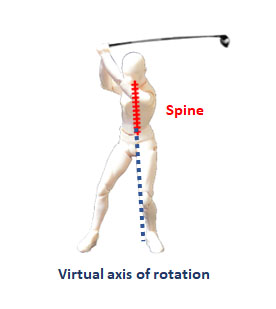
It is sometimes said that the spine is the axis of rotation for the golf swing, but the spine is only extending to the pelvis. Since it is not in contact with the ground, it’s not exactly the axis of rotation. Therefore, this analogy involves being conscious of the virtual axis of rotation.
It will take a considerable amount of time to be able to consistently swing the same axis of rotation that is not in contact with the ground at the exact position every time, and it is difficult to obtain a stable axis of rotation. Moreover, golf swings do not always take place on a flat ground, so it takes many rounds of experience to be able to hit a stable shot anywhere, like a professional golfer or an advanced golfer.
Therefore, the method of placing this virtual axis in an ideally stable position becomes a shortcut to creating a highly reproducible swing. To do this, it is necessary to use the left and right feet as a reference, which are in contact with the ground.
Both feet are pressing on the ground with heels and toes. If this position does not change during the swing, the imaginary axis of rotation can be stabilized.
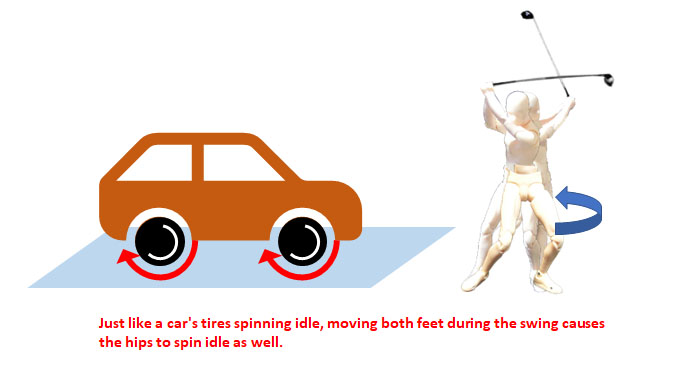
Next, is to determine the axis of rotation that serves as a reference point when rotating the hips. If you imagine rotating your hips moving your left and right legs or both knees, it not only makes it difficult to rotate your hips at high speed, but it also makes the axis unstable.
It’s like car tires slipping on a snowy or icy road. You may think you’re rotating your hips at high speed, but because the foundation (your feet) supporting the rotating hips is also rotating.
Now, what if we use the right hip joint as the axis of rotation for the left hip? Use the right hip joint as the pivot point without moving it. From the backswing to the top position, the left hip rotates forward. At the start of the downswing, rotate the left hip rapidly backward and toward the left buttock, using the right hip joint as the pivot point.
If you have a movement to extend the slightly bent left knee at this time, it will accelerate the rotation speed of your left hip. Once the left hip has rotated sufficiently, the left hip joint becomes the pivot point, and the right hip rotates towards the target direction.
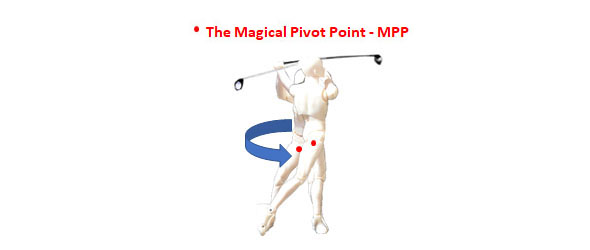
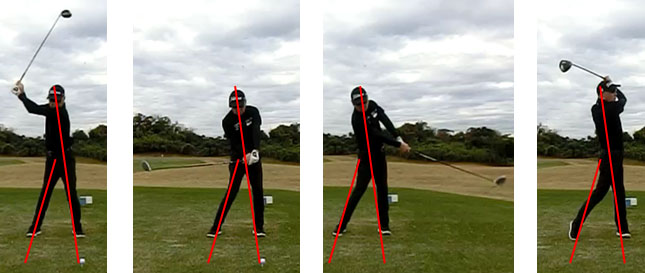
This rotation of the pelvic acts as a virtual axis of rotation for the entire hip, located around the middle of the navel and tailbone. Therefore, if the position of the right hip joint is stable at the start of the downswing, the virtual axis of rotation of the swing will remain constant. In other words, the prerequisite for a stable clubhead trajectory is established.
Regardless of the style of golf swing, if there is an MPP, the swing will be stable.
Mastering the MPP
Acquiring the MPP is not as difficult as it sounds.
The MPP is the position of the right hip joint at the top position of the swing.
In this article, we will provide you the basic instructions, so adjust the position of the right hip joint according to your swing style.
First, check the position of the right hip joint at address.
If your weight is evenly distributed on both feet, your right hip joint should be slightly inside the right ankle.
Rotate your upper body and hips to the right on the backswing.
If you rotate around your spine, your right hip joint will move slightly backward. Extend your right knee and bend your left knee slightly. Move your left hip joint slightly forward.
At the same time, move the position of the right hip joint closer to the center of your body (the line of the spine). Imagine that you are bending the right hip joint a little more deeply. Your left knee should not move towards your right knee. Instead, your left knee should be facing the direction of your left toe. The position of the right hip joint at this point will be the MPP.
During the downswing, the right hip joint serves as the pivot point for rotation. This position should remain unchanged until the left hip fully rotates. It’s not a problem if your right hip joint to move in the target direction during downswing.
Turn your left hip from impact to follow-through all at once. Straightening your slightly bent left knee also helps to accelerate the rotation of your hips . As soon as your hips begin to rotate, rotate your upper body to the left. To increase the rotation speed, imagine turning your chest facing left while it was facing right.
If your arms or hands are getting ahead of the rotation of your hips in the downswing, try moving your left hip slightly towards your left foot toe at the top position of your swing to generate some recoil, and then give a quick twist of your left hip backwards.
Both arms are swung in sync with the rotation of the hips and upper body. If you try to swing the club widely, you’ll risk swinging too late and losing power.
During the downswing, aim for a “Darts shot” (which will be explained later) where the grip end points to the lowest point of the clubhead. The trajectory of the clubhead will be more linear towards the ball.
When your left hip is sufficiently turned, extend your right knee and rotate your right hip in the direction of your target. Your pivot point during this movement will be your left hip joint.
In the finish, your swing will be a beautiful one with both legs extended and a straightened back.
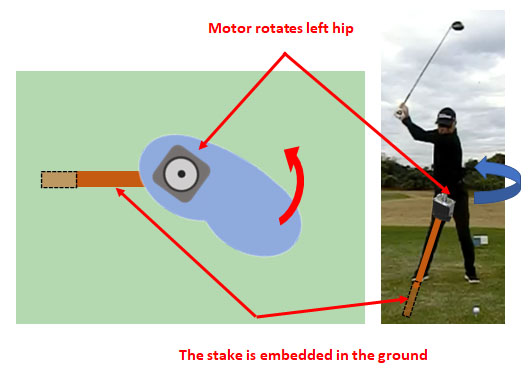
If you have an unstable position of your right hip joint, you can also consider a robotic idea of using your right foot as a support.
Suppose your right foot is a stake planted in the ground. At the tip of the stake (where your right hip joint is), there is a motor that rotates your left hip during the downswing.
With this image in mind, your right hip joint stays fixed, allowing your left hip to rotate smoothly at high speed.
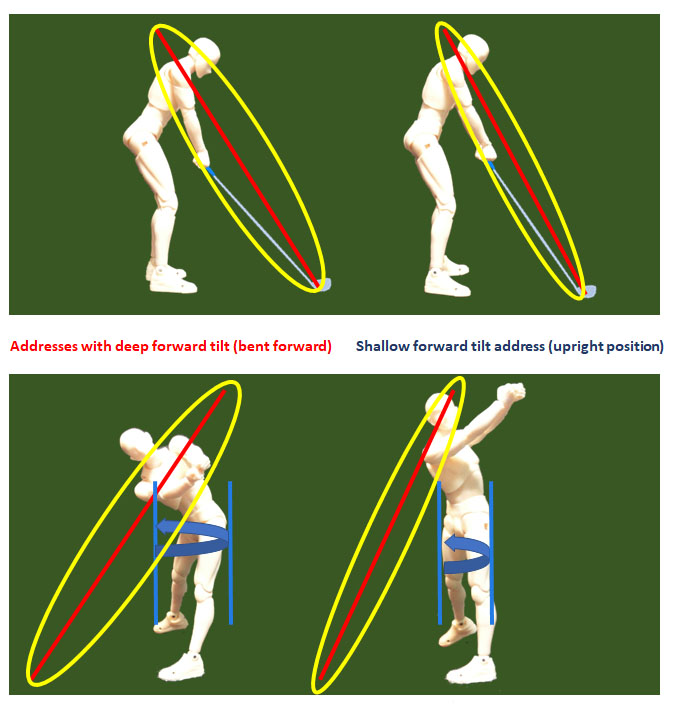
Differences in the clubhead trajectory is dependent on the address posture
The magnitude of the rotation of the hips during a swing using the MPP depends on the angle of forward tilt of the upper body at address (see figure below). At the same time, the trajectory of the clubhead also changes.
In the case of a slightly bent-over address with a deep forward tilt angle, as the left hip rotates backwards from the start of the downswing, the forward lean angle of the upper body becomes deeper than at address, and both hands are swung to the left side. The trajectory of the clubhead will be about 45 degrees to the ground. This type of address posture is suitable for male golfer, especially young and strong athletes as it increases the distance of the left hip movement.
On the other hand, in the case of a shallow forward lean and a slightly upright posture at address, the rotation range of the hips will be narrower, and the distance of movement of the left hip will be shorter. However, because the aforementioned moment of inertia of the body decreases, the rotation speed of the left hip increases. As a result, this type of swing is similar to swinging both hands up at the front of the body instead of swinging them to the left side after hitting the ball.
The trajectory of the clubhead will be greater than 45 degrees to the ground. This kind of upright swing is effective for women and senior golfers, as it can provide both distance and directional stability.
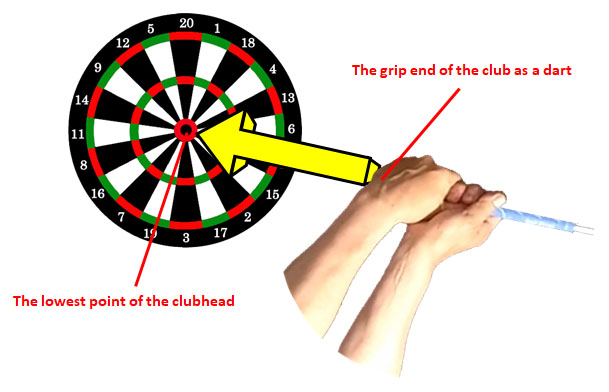
The Darts Shot
Video
Once you’ve mastered the MPP, let’s practice the Darts shot. In a Darts shot, aim the grip end of the club towards the clubhead’s lowest point during the downswing. Imagine the grip end of the club as an arrow (dart), and the lowest point of the clubhead as the center of the dart target (dartboard).
When your hips rotate on the downswing, aim the “arrow” at the grip end towards the “target” at the lowest point of the clubhead and release it.
The “arrow” should not be released immediately. Aim for the “target” as much as possible and release it at the last minute.
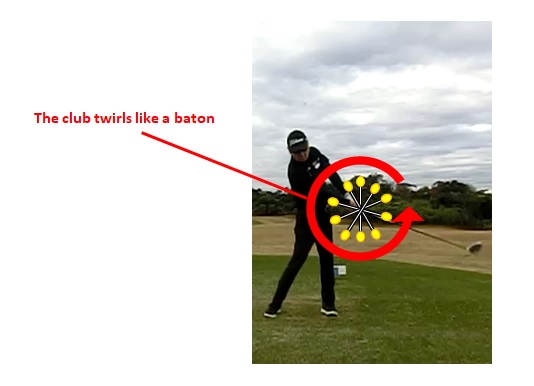
This action allows the club shaft to “twirl” on impact, enabling you to hit a highly accurate shot.
The rotational motion of the club at this time is similar to the spinning motion of a baton in baton twirling.
Mastering the Darts Shot
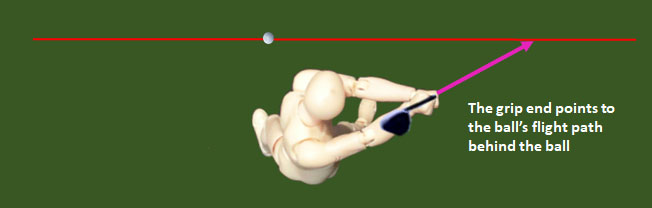
To master the Darts shot, first check the direction of the grip end in the top position. Whether the shaft is at an angle to the ground or close to perpendicular to the ground, make sure the grip end points to the ball’s flight path behind the ball.
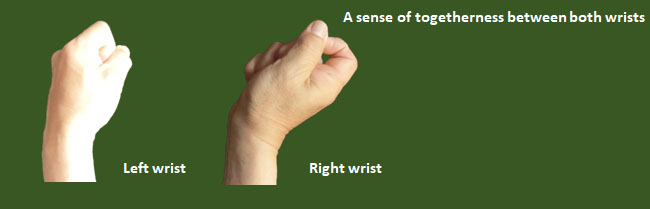
Next is the shape of both wrists. For the right hand (in the case of right-handed), imagine holding the “arrow” of a dart. Use your thumb and other fingers to support the grip like an arrow. The right wrist is bent towards the back of the hand . Remember to keep in mind the firmly bent shape of your right wrist.
The left wrist should be flat or slightly curved towards the palm of the hand to match the shape of the right wrist. In any case, keep your hands close together to create a sense of unity.
When the downswing begins, the grip end moves along the ball flight path behind the ball. If the grip end is already pointing towards the lowest point of the clubhead or in the direction of the target, you will not be able to release the “arrow” towards the “target.” This will be a swing that is not executing a Darts shot.
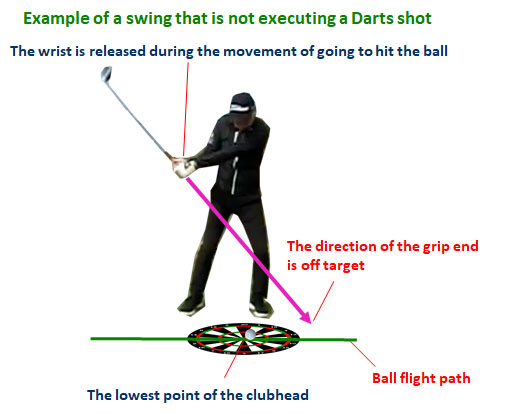
A swing that executes a dart shot is achieved by rotating the hips and upper body, and keeping the shape of both wrists until they become close to the lowest point of the clubhead.A swing that executes a dart shot is achieved by rotating the hips and upper body, and keeping the shape of both wrists until they become close to the lowest point of the clubhead.

Executing a Darts shot involves maintaining the shape of both wrists in the top position to perform the downswing, but this movement is probably the most difficult to master. When you are going to hit the ball, your wrists tend to release too early.
Imagine you are playing “darts.” Even if you don’t hit the ball, if you release the “arrow” at the grip end, it will always be a nice shot.
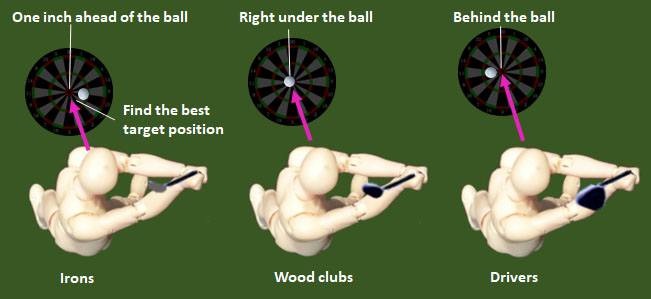
The position of the lowest point of the clubhead
The “target” that is the lowest point of the clubhead varies depending on the type of club being used. For irons, it is generally one inch ahead of the ball in the target direction, for woods, it is around directly below the ball, and for drivers are slightly behind the ball.
Also, the target position may also vary depending on the type of swing or shot being taken, so is it important to practice and find the optimal “target” position for each shot.
Mastering various shots
A straight shot of a straight ball is the basics of making shots. Once you have mastered the straight shots, you can easily learn how to hit a draw or a fade.
Also, if you find that your shots have a draw or a fade during practice, you can try practicing straight or opposite shape shots, taking cues from the explanation of various shots in the following section, such as address stance, ball position, club face direction, and arm swing technique.
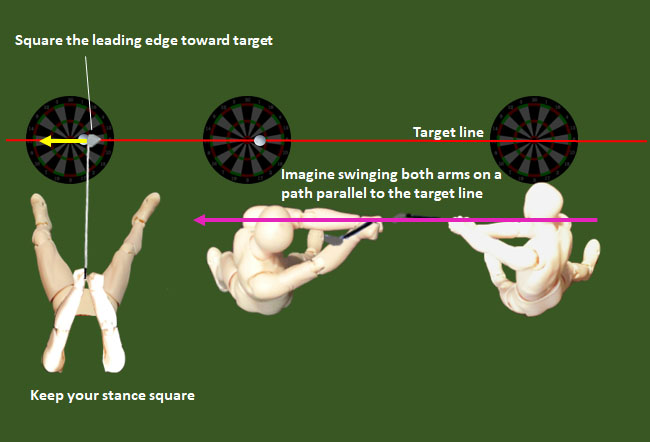
Straight Shots
Generally, your stance should be square, and the leading edge should also be square to the target line. During your swing, imagine swinging both arms parallel to the target line.
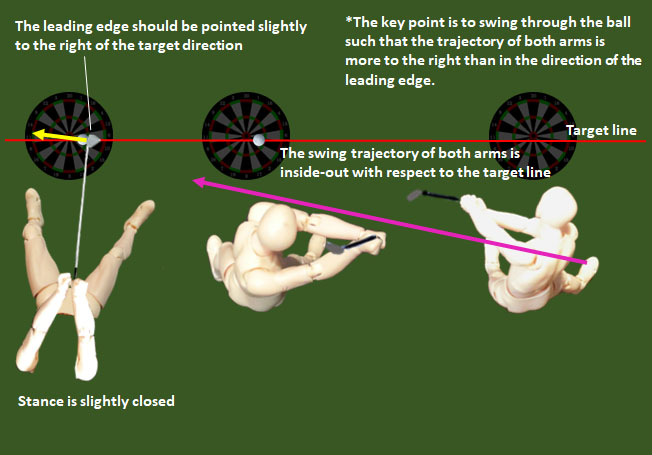
Draw Shots
In general, it will be a slightly closed stance, and the leading edge of the clubface should be pointed slightly to the right of the target line.
During the swing, imagine both arms swinging inside-out with respect to the target line.
It is important that the trajectory of the clubhead during this swing is to the right of the target line rather than in the direction of the leading edge.
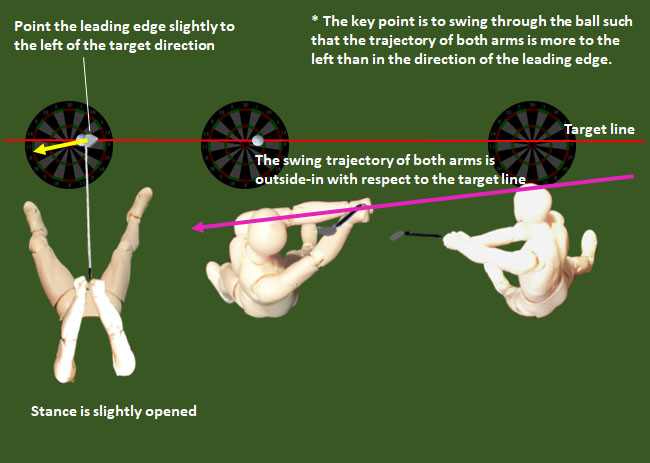
Fade Shots
In general, your stance should be slightly open, with the leading edge of the clubface pointing slightly to the left of the target line.
During the swing, imagine both arms swinging outside-in to the target line.
It is important that the trajectory of the clubhead is more to the left of the target line than in the direction of the leading edge.
Ball Flight Laws
To learn how to hit a ball with curve, you need to understand the ball flight laws. The direction of the clubface at impact and the path of the clubhead determine the ball’s curve.
Of course, if the direction of the clubface is square and the path of the clubhead is straight, it will be a straight ball.
The ball curves when there is a difference between the direction of the clubface and the path of the club head.
For a draw or hook shot, the clubhead moves to the right towards the target direction with respect to the direction of the clubface. When the difference in angle increases, it becomes a hook ball.
For a fade or slice shot, clubhead moves more to the left towards the target direction with respect to the direction of the club face. When difference in angle increases, it becomes a slice ball.

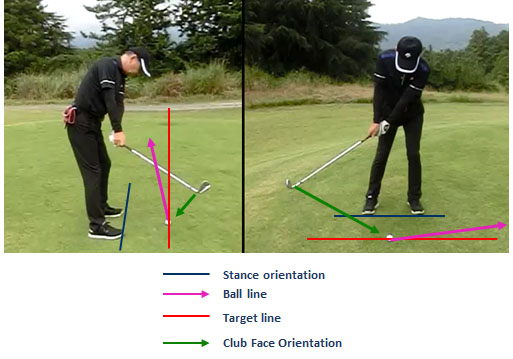
Professional Approach Shots
Video
As your golf skills improve, the precision of your approach shots and chips around the green becomes increasingly important, especially for shots within several tens of yards to the hole.
To avoid missing approach shots like a professional, you need to understand the behavior of the clubhead and the ball during approach shots. We will explain this in detail, so please use it as a reference for your own approach shots.
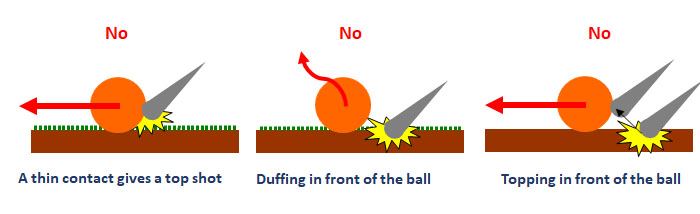
When the turf is in good condition and the ball is floating above the ground, the landing point of the clubhead can vary from front to back, making it less likely for mishits even when making contact with the ball.
When the turf is thin, the landing point of the clubhead can vary front and back, causing mishits like tops or duffs. In addition, when the ground beneath the turf is hard or it’s a bare ground, if the clubhead lands in front of the ball, it becomes a topped shot instead of a duff shot. At this time, the clubhead accelerates and the ball comes out with a strong force. Moving back and forth around the green is caused by this type of mishit.
To reduce the number of missed approach shots, you need to know the optimal trajectory and lowest point of the clubhead. Approach shots basically use approach wedges (AW) and sand wedges (SW). Compared to middle irons, long irons, and wood clubs, the shafts of these wedges are shorter, and the heads are heavier.
If the shaft is long, the angle of incidence is gentle, so the tolerance range of the impact zone is wide. If the shaft is short, the angle of incidence becomes steep, and the tolerance range becomes narrow. When making an approach shot like a normal shot, the landing point of the clubhead tends to be slightly in front of the ball. This is because the shaft is short and heavy, causing the clubhead to fall earlier than expected. In particular, as you can imagine in a sweep shot, there will be many missed shots.

When the turf is in good condition and the ball is floating above the ground, there are fewer mistakes in approach shots. This is because there is space underneath the ball, creating a pathway for the clubhead, which widens the contact points tolerance range.
In the case approach shots with thin turf, there is almost no tolerance range for contact points with the ball because there is no pathway for the clubhead to pass and it hits the ground.
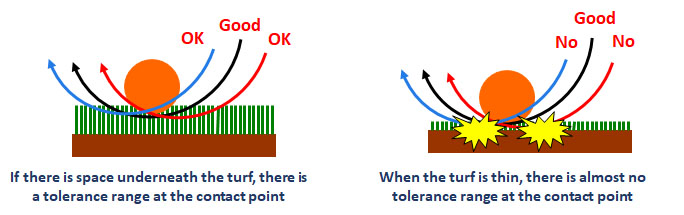
Thus, with a narrow tolerance range of contact points, approach shots with clubs like AW or SW require greater accuracy compared to shots from other clubs . In general, there is advice for approach shots such as having a compact swing, stiffening the wrist, etc., but there is something more important than that.
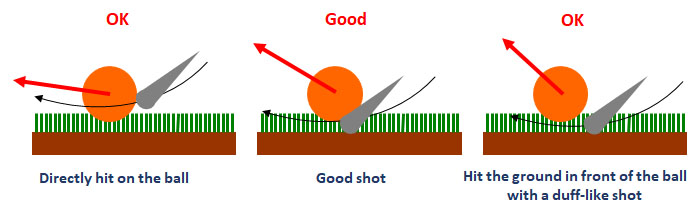
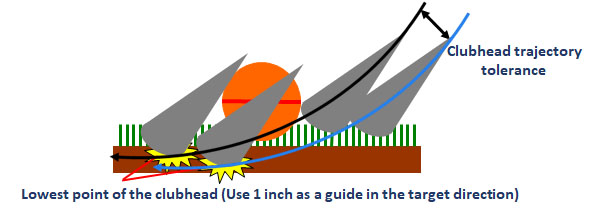
You should focus on the lowest point of the club head in the direction of the target from the ball. Many amateur golfers think that the lowest point of the clubhead is directly under the ball. However, this can lead to poor ball contact. The contact point of the ball is acceptable from around the equator of the ball to the bottom of the ball. To make this contact point possible, the lowest point of the club head needs to be in the direction of the target from the ball. Amateur golfers should aim for a margin of about 1 inch while professionals aim for more than 4 inches.
If the clubhead’s lowest point is appropriate, after the ball flies, the clubhead will start to dig into the ground, giving a sensation similar to a duff shot. However in reality, it’s actually a good shot. This is an approach shot of a professional golfer. In this way, if the lowest point of the club head is appropriate, the tolerance range of ball contact becomes wider. Instead of focusing on hitting the ball, focus on the lowest point of the club head and make your approach shot. Even if the shot lacks a little accuracy, it will not become a big missed shot.
With this, you will be able to cope with thin turf, or soft turf where the ball sinks.
Previously, when Tiger Woods returned to the tour, he repeatedly missed his approach shots. There is an anecdote that in response to a golf reporter’s question, “Isn’t Tiger having yips in his approach shots?” Tiger Woods replied, “I’m just looking for the lowest point of the clubhead.”
For those struggling with approach shots, please use this as a reference.
* As an exception, when the turf is long lie or the ground is extremely soft, there is a lob shot where the lowest point of the clubhead is imagined to be behind the ball so that the clubhead does not come into direct contact with the ball.
The path taken by the clubhead from an overhead view is also important. Golfers who usually swing with an inside-out on their regular shots are more likely to miss the shank if they try to use the same approach shot.
It’s better to use a straight shot with an inside-in path or a slice shot with an outside-in path to minimize mistakes. With these shots, you can stop the ball on the green.
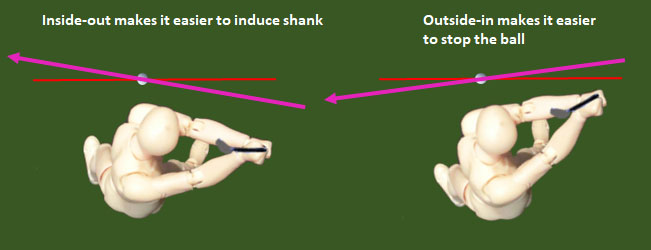
When viewing the clubhead position in the top position from behind, it will be outside the target line.
It is not recommended to pull the clubhead inside at the start of the backswing.
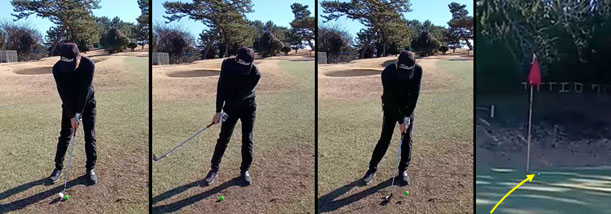
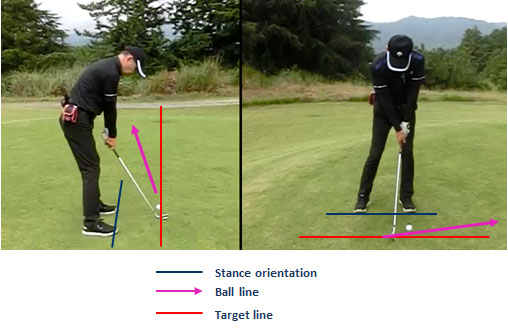
The Stinger Chip Shot
Video
Approach shots around the green can be prone to topping the ball when on hard ground under the turf or bare earth. This is where the stinger chip shot comes in.
The stinger chip shot is a low-flying and powerful shot, but it slows down the ball on the green due to the amount of spin.
Hitting a soft shot with a slow swing near the green can be challenging. It’s easy to end up hitting the ball too hard, but if you can execute a strong shot with spin, you can use an AW (approach wedge) or a SW (sand wedge) with confidence around the green. Once you learn the stinger chip shot, you will be able to make shots that generally are considered difficult lie to get closer to the hole which will definitely improve your score.
The principle
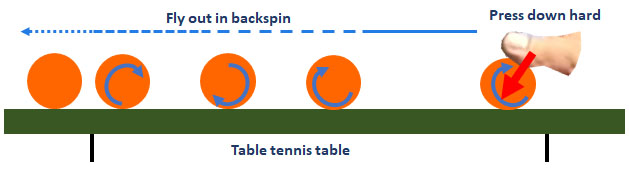
First of all, let’s understand the principle of the stinger chip shot. Imagine a table tennis table and a table tennis ball. Place a table tennis ball on the edge of a table tennis table and press the table tennis ball from above with the thumb of your dominant hand. The table tennis ball will fly out vigorously in back spin. It will slow down and stop sharply or even move in reverse direction as it reaches the other end of the table.
The same principle is applied when using an AW or a SW for the stinger chip shot.
Club and Ball Behavior
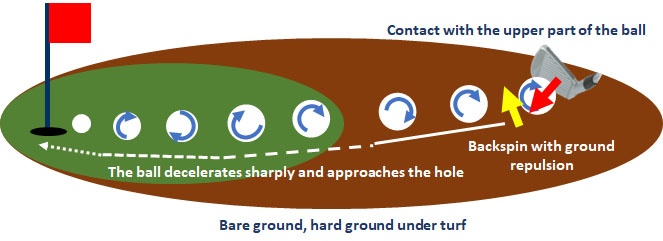
The face of an AW or a SW makes contact with the top of the golf ball. The club face, then descends towards the ground similar to pressing a table tennis ball against a table tennis table with your thumb. Then, the golf ball is hit with backspin, resulting in a low flying and powerful shot. It’s like hitting a shot that pierces through the air towards the hole, hence the name “stinger.”
The stinger chip shot makes use of the repulsion from the ground to create a powerful shot . The harder the ground is like a table tennis table, the more effective it is. If the ground is soft, the golf ball may sink slightly into the ground, reducing the amount of spin on the ball.
However, even with this type of lie, the amount of spin decreases and the ball loses momentum, resulting in a closer approach to the hole.
* If the grass is long or the ground is extremely soft around the green under the same situation, a stinger chip shot will not be effective, and so a lob shot is recommended instead.
How to do the stinger chip shot
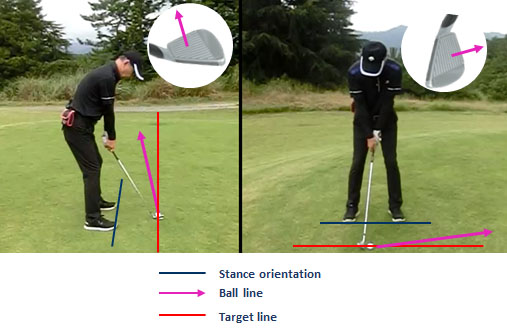
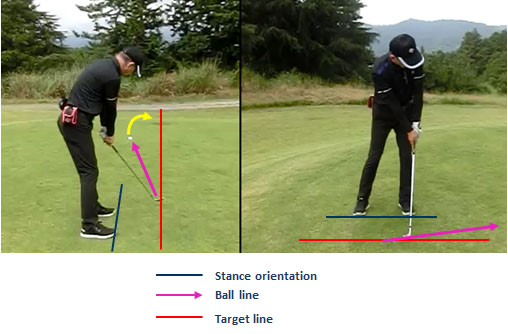
Address
The address should be in a closed stance with respect to the ball flight line. Also, when using a SW, you will have an extreme closed stance.
If you stand up a clubface loft and a square leading edge (90 degrees to the flight line), you will naturally have a closed stance.
Since the ball curves to the right after landing, the target line will be to the right of the flight line. Therefore, you need to aim slightly closed or square to the target line.
Top Positions
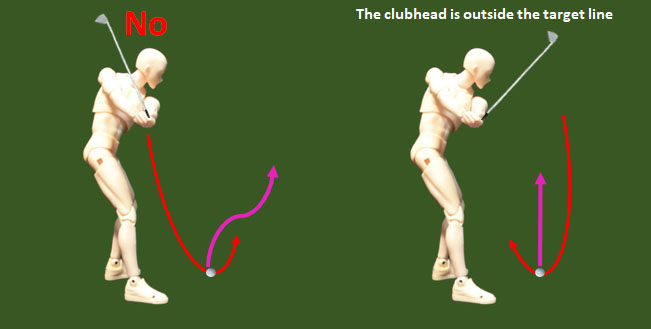
At the top position, the clubhead should be located outside the ball flight line.
Try to keep both arms as straight as possible. Cock your right wrist deeply and lift the clubhead. Try not to bend your knees too much.
The flight distance of the ball in this image is about 5 yards with an AW. The rotation of the hips and upper body creates a downswing that drops the clubhead, so the height of the clubhead will be about this level.
Keep the clubface shut, facing towards the ball (square).
Impact from the downswing
On the downswing, aim for the lowest point of the clubhead (one inch ahead of the ball) and drop the clubhead forcefully. This ensures that the clubface will make contact with the upper part of the ball before the clubhead touches the ground. At this time, the clubface will be closed and facing in the direction of the ball.
During the downswing, rotate your hips and upper body to the left. Imagine both arms swinging forward along with the left rotation of the upper body. If you drop the clubhead with your arm or hand at the start of the downswing, the clubhead will hit the ground before making contact with the ball, resulting in a duff shot. At first, you may experience a series of duff shots like this. Practice rotating your hips and upper body so that the clubhead is in direct contact with the ball.
If you do this correctly, the ball will have backspin and fly out powerfully after impact.
Follow-through to finish
After impact, the clubface makes contact with the ground, causing it to slow down. The follow-through and finish will be complete while maintaining the shape of both wrists as at impact. There is no need to swing and lift the clubhead forward.
The ball will fly out with great speed, lands, spins and curves to the right side, decelerating sharply upon landing (in the case of right-handed hitting). Even with a ball that has a lot of momentum passing through the hole, it will stop abruptly after passing through the hole, so you won’t feel like you have made a bad shot.
To master the stinger chip shot, it is important not to loosen any part of your body. If you can drop the clubhead from the top position towards the ground with mechanical motion like that of a robot, you will be successful at executing the shot.
Learn the club’s features and overcome bunkers
Video
Bunker shots are not particularly difficult for professional golfers.
This is because they can adjust the depth of the clubhead in the sand.
However, it is one of the challenging shots for amateur golfers.
If it’s a fairway cross bunker, ball height is not required, so the sand does not cause any effect on ball contact. On the other hand, guard bunkers around the green require ball height, so sand can get between the clubface before making contact with the ball, making it difficult to control the distance of the ball.
There are many variations in bunker shots, finding the way that suits you is a shortcut to eliminating anxiety about bunker shots.
We will explain the behavior of the clubhead and ball in bunker shots, so please use it as a reference for your own bunker shot.
Bounce of sand wedges
The sand wedge has protruding part of its sole called the bounce, and it has the function of limiting the resistance of the club to sand. The angle formed by the line along the sole surface and the line parallel to the ground (bounce angle) is measured, and a high bounce has a large angle, while a low bounce has a small angle.
High bounce and low bounce have their own characteristics, so understanding them will help you to escape from the guard bunker more effectively.
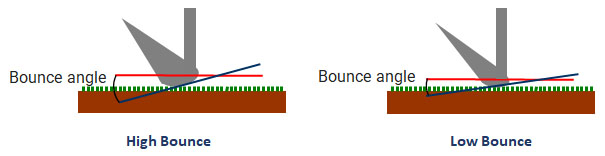
Characteristics of High Bounce
When the bounce angle is large, the resistance of the sole (bottom) part of the clubhead to the sand is high, so the clubface will rise when it comes into contact with the sand. The clubface movement will be such that it picks up the ball.
With the high bounce sand wedge, if you drop the clubhead slightly in front of the ball, the club itself will lift the ball up, making it shot that prioritize escaping from the bunker.
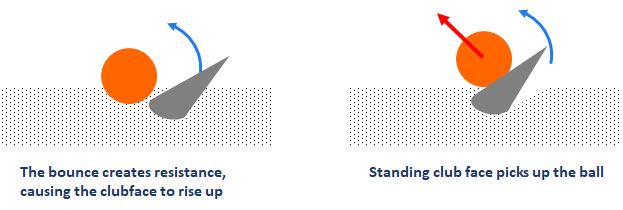
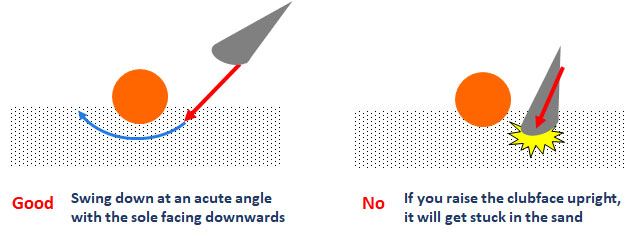
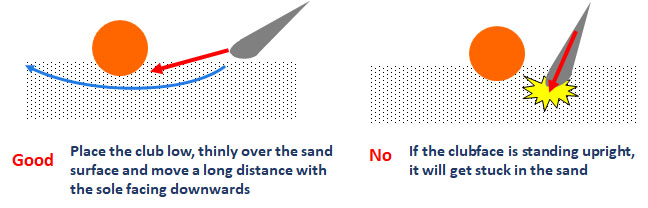
To effectively use a high bounce sand wedge, swing the sole facing downwards (the face facing upwards) at an acute angle (left image).
If you swing down with the clubface upright, the bounce angle will not work well, and the ball will not rise up. The sand wedge will get stuck in the sand (right image).
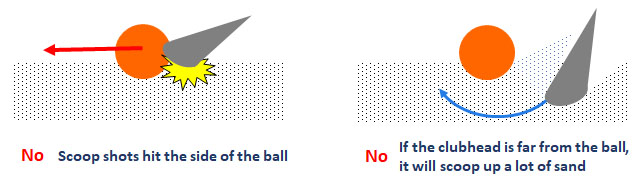
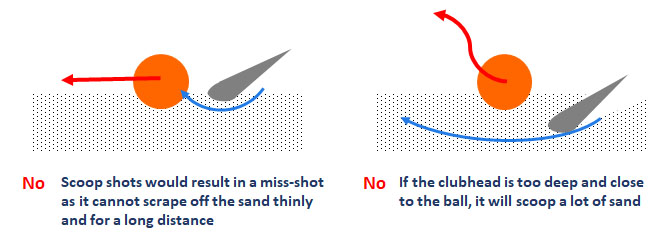
Also, in the case of a shallow scoop shot where the clubhead cannot penetrate into the sand, the leading edge hits the side of the ball, making it impossible to escape from the bunker. (left image).
On the other hand, if the club head enters considerably in front of the ball, the bounce will work and the clubface will rise early, scraping off a lot of sand before picking up the ball. Therefore, the ball hardly flies (right image).
Characteristics of Low Bounce
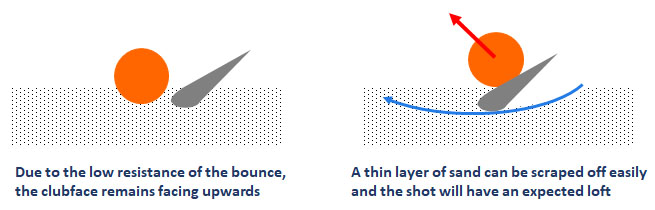
If the bounce angle is small, when the club head enters the sand, the resistance of the sole (bottom) is reduced, and the clubface faces upwards, scraping off a thin layer of sand.
For a low bounce bunker shot, the clubhead is inserted low in front of the ball. Since the clubhead has little sand resistance, it can scoop off an appropriate amount of sand under the ball, allowing the ball to travel at the expected distance and height according to the loft. Even if the position of the club head entering the sand can vary slightly, it has little effect on the shot. However, it is difficult to control the depth of the clubhead that dives into the sand and so this is a shot intended for professionals and advanced players.
To use the low bounce sand wedge effectively, keep the sole facing downwards (the clubface should be facing upwards) and tucks the club head low into the sand (left image).
If you swing the clubface standing upright like a normal shot, you will not be able to pick up the ball well without making effective use of the bounce angle. The sand wedge gets stuck in the sand (right image).
Also, if you try to pick up the ball by inserting the clubhead shallowly into the sand like a scoop shot, you will not be able to scrape off the sand thinly and for a long distance, so you will not be able to escape from the bunker well unless the clubhead is in the appropriate position (left image).
On the other hand, even if the clubhead enters well in front of the ball, the clubhead will scrape off the sand because the bounce is not working, but if you go deep into the sand, the amount of sand scraped off increases and it will be difficult to escape from the bunker because the height of the ball is not high (right image).
Robot Swing Laboratory’s putting app PUTTMAN
Click Website PUTTMAN
Click App PUTTMAN

1600-188x300.jpg "v1basics")
-1-188x300.jpg "yips")